Prepare in advance
A total eclipse gives you one opportunity under strict timing constraints. This is the most important page in the guide: the work that makes eclipse day calm is all done in the weeks before it.
The advance checklist
1 Set the site and start the plan early
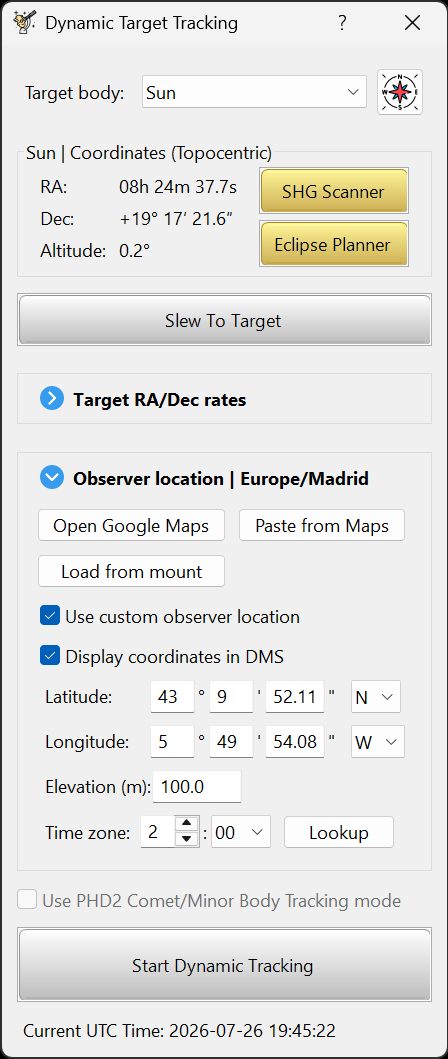
Set your observing site first. Before opening the planner, open the Dynamic Target Tracking tool (the astronomer button), select Sun in the Target body: list, and select the location where you'll observe. The Eclipse Planner button appears only while Sun is the selected target body. The site's exact coordinates and time zone drive the timing of every phase. Open the planner with that button and build the starting plan. Do not approve it until you have measured and applied the imaging base in the next step, reviewed the derived phase recipes and run the camera benchmark. After that, approve the completed plan and run simulations against it until the flow is familiar. Edits made later leave an unapproved draft that the preflight dialog will flag.
If your exact spot changes later, even on eclipse day, update the site in that tool. The planner readjusts all the contact timings automatically. Nothing else needs to change as long as you are still within the totality path.
2 Measure the imaging base with the physical rig
Assemble the same main scope, camera, optical train and complete filter stack you intend to use for the eclipse. In SharpCap, frame the filtered full solar disk and adjust exposure and gain until the photosphere is bright and detailed without clipping. Record that pair and the effective total ND rating. If a certified ND 5.0 solar filter is supplemented by a standard photographic ND filter, add their optical densities; for example, one additional stop (ND 0.3) gives an effective density of ND 5.3. Never use a photographic ND filter as the solar filter on its own.
Enter the values under Imaging base in Plan preferences.... HelioMaker automatically calculates the exposure plan by combining the full solar disk exposure, camera gain and filter density with Fred Espenak's eclipse exposure recommendations to derive the exposure and bracket recipe for every phase. Keeping the same camera gain across all phases is recommended. Tune individual recipes afterwards in the Phase editor, run the System benchmark test, then approve and rehearse the resulting plan.
3 Practise daytime polar alignment
At eclipse time the Sun is up and Polaris is invisible, so your normal nighttime alignment routine does not apply. You need a reliable daytime / solar polar alignment routine that you have done before. HelioMaker's integrated help has a full chapter on this: Daytime Polar Alignment Using HelioMaker and PHD2. It uses PHD2's Guiding Assistant or Drift Alignment tool on the Sun. Practise it on ordinary sunny days first.
A practical, preliminary observation from the author (not a precise procedure): with the mount's altitude already calibrated, PHD2's reported calibration angle, which is the angle between the RA and DEC calibration axes, seems to hint at which way azimuth is off:
- Mount head pointing to the right of Polaris → angle < 90°
- Mount head pointing to the left of Polaris → angle > 90°
Treat it as a quick nudge for azimuth between sessions, not a measurement. A short focal length guide scope tolerates a few degrees of azimuth error and will usually still guide. This is one observer's finding; whether the sign convention repeats across different mounts, hemispheres and guide orientations is unconfirmed. Verify it against your own drift measurements before you rely on it.
4 Practise solar guiding well before the day
Solar / limb guiding through HelioMaker and the custom PHD2 fork is finicky. Get PHD2 calibrating and guiding on the Sun on several ordinary sunny days first with whichever setup you will use: shared camera for a full solar disk main camera, or a separate guide scope with its own camera and filter if you need guiding through totality or will image only part of the disk at high magnification (see Gear & rig requirements).
5 Verify your eclipse timing
In the planner, click "View all eclipses for this site". It opens
timeanddate.com for your observer coordinates
(https://www.timeanddate.com/eclipse/in/@<lat>,<lon>). Compare its
C1 through C4 contact times with the times HelioMaker computes. They should agree closely.
- A large discrepancy almost always means wrong site coordinates or elevation, or confusion between local time and UTC. Fix that before doing anything else.
- Enter accurate latitude, longitude and elevation. Small position errors shift the contact times and the totality duration.
- Choose whether to apply standard atmospheric refraction in Plan preferences. The correction uses fixed standard conditions of 10 °C and 1010 hPa; there are no temperature or pressure entries. Preflight only displays the plan's choice as read-only text.
6 Rehearse the full run
Rehearse the complete workflow so nothing on the day is new:
- A Dry run with timing only and no capture, to learn the console, the cues and the refocus schedule.
- A Wet run against the integrated eclipse simulator so the HelioMaker capture path, filenames and disk usage are exercised too.
Rehearse until you know, without thinking, what each cue means and what you should be doing with the filter when it fires. → Simulation options
7 Logistics
- Accurate PC clock. Synchronize it with a reliable network time source. HelioMaker has a clock synchronization step in the preflight checklist; a wrong clock desynchronizes the whole sequence.
- Charged batteries for the mount, cameras, focuser, dew heaters and the PC, with spares.
- Ample free disk for the full capture. The preflight checklist estimates how much you will need.
- A complete chain test with HelioMaker, SharpCap Pro and the custom PHD2, from camera to file, on your actual travel rig.
- Spare solar filters for both scopes, and a plan for wind and dew.